M.E. Ferree and Gerard Krewer,
Retired Extension Horticulturists
Reviewed by Bob Westerfield
Introduction
Deciduous fruit plants common to Georgia must be propagated asexually because they do not come true to seed. This makes it necessary to reproduce the desired fruit plants by methods such as cuttings, runners, layering, budding or grafting. Due to differences in characteristics of deciduous fruit plants, certain methods of propagation will work for some fruits while other asexual methods are needed to reproduce other fruits.
Generally, if plants can be reproduced by cuttings and the root system of the cuttings will develop satisfactorily, then the more complicated methods of propagation are not used. Methods such as budding and grafting are used on most tree fruits where a specific rootstock is desired, or when cuttings do not root satisfactorily or do not develop a root system sufficiently large to support a tree of the desired size.
This publication discusses the common techniques used to asexually propagate fruit plants adapted to Georgia. Those discussed are by no means the only methods of asexual propagation. However, the methods omitted are not required to succeed in reproducing adapted fruits.
T-budding and Whip Grafting
Several fruit plants are commercially propagated by either T-budding or whip grafting. T-budding is a summertime method of propagation; the whip graft is done in the winter. The orchardist uses other grafting techniques when a variety change of existing trees is desired or an injury is to be repaired. These methods of grafting will be discussed later.
Fruit plants commonly propagated by T-budding and/or whip grafting are apples, peaches, nectarines, pears, persimmons and plums. Propagation by T-budding and whip grafting differs from other methods of asexual propagation because a rootstock and a scion piece of the desired variety are required. Therefore, rootstock requirements of the common fruits propagated by these methods should be understood before one attempts them.
Rootstocks Used in the Nursery
Most fruit trees are propagated on seedling rootstocks. Apples and pears, however, are sometimes propagated on clonal rootstocks produced in stool beds. A number of nurseries in the Northwest specialize in production of clonal rootstocks. Fruit tree nurseries that produce apple and pear varieties on clonal rootstocks buy these rootstocks from specialized nurseries. Many of the rootstock nurseries also sell seedling rootstocks to nurserymen.
Seed Germination for Rootstocks to be Grafted or Budded
Mature seed of deciduous fruits grown in Georgia will not germinate immediately, but first require conditioning by a period of cool, moist storage at temperatures slightly above freezing. This "after-ripening" process is necessary to satisfy the rest requirement of the seed embryos, and to soften the stony layer surrounding some seed. Two methods are used to after-ripen deciduous fruit tree seeds—stratification and fall seeding. Stratification is the desired method for small-scale germination; direct fall seeding is used extensively by commercial nurseries.
Stratification
To stratify seed, first soak the seed in water for 24 hours. While the seed are soaking, prepare a stratification mix of one-third peat moss and two-thirds sand (by volume). Following soaking, mix the seed with the stratification mix, or layer the seed in the mix by placing an inch of mix, a layer of seed, an inch of mix, a layer of seed and so on in the container. To prevent seed decay, the mix should be moist, not wet. Squeeze excess moisture out by hand.
As soon as sprouting begins, the seed should be planted or stored at a lower temperature (32° to 33° F) until planting is possible. Germinating seed must be planted carefully because the young sprouts are brittle and easily broken. It is not necessary to separate the mix from the seed when planting. The seeding rate of the sprouting seed should be about eight to 14 seed per foot of row in rows 4 feet apart. Apple, pear and persimmon seed should be planted about 0.75 inches deep; peach should be seeded about 1.5 inches deep. If germination is good, thin the seedlings so there are four or five seedlings per foot of row.
Polyethylene bags are convenient containers for stratifying small lots of seed. The plastic prevents loss of moisture, and the beginning of germination can be observed without opening the bag. Two or three small holes should be cut into the top of the bag to allow for air exchange. The mix should be checked periodically to insure that drying out does not occur.
After-ripening seed should be maintained at temperatures between 35° and 50 °F for periods of 12 to 20 weeks, depending on the species (Table 1). Persimmon rootstocks are generally too small for June budding but normally grow large enough for dormant budding.
Seed should be placed in moist medium at temperatures of 35 to 50 °F for the number of days indicated.
| Table 1. After-ripening Period Required for Seed of Deciduous Fruit Trees Adapted to Georgia |
| Species |
Time Required (days) |
| Apple (commercial varieties) |
60-80 |
| Pear (Pyrus calleryana) |
45-90 |
| Peach, Plum and Nectarines (Lovell, Halford, Nemaguard* - peach varieties) |
90-130 |
| Persimmon (Diospyros khaki, D. Virginian or D. lotus) |
90-120 |
| *Nemaguard should be used only in orchards on sandy soil. |
Fall Seeding
If after-ripening of the seed is to be done in the field, plant the seed in mid-October. A shallow, narrow furrow should be made so the seed will be planted either 0.75 inch deep for apples, pears and persimmons or 1.5 inches deep for peaches. In heavy soils with a tendency to crust, line the furrow with a small quantity of peat moss. After seeding, lightly cover the seed with peat moss and fill the furrow with soil. Avoid excessive mounding (more than 1 inch) of the furrow.
When to Asexually Propagate the Seedlings
Peach seedlings, if properly cultured, should be large enough to bud by late May or June following seeding. Apple and pear seedlings get off to a slower start, and should be dug and whip grafted the winter following seeding, or budded in the original row during July of the second year.
Specific Rootstocks
Apple Rootstocks
Apple varieties are budded or grafted onto either seedling or clonal rootstocks. Varieties grafted on seedling roots produce the largest trees; those grafted on clonal roots vary in size, depending on the clone selected. Clonal rootstocks were developed so that tree size could be manipulated depending on the clone selected (Table 2). Also, clones vary in resistance to insects and diseases. Rootstock selection is often based on resistance to soilborne diseases or insects common to a particular area. The two most common clonal rootstock series used in Georgia are the Malling (M) series and the Malling Merton (MM) series. M7 is the best rootstock at this time for middle and northern Georgia. Seedling rootstock is recommended for South Georgia. Dwarf rootstocks such as M9, M26, and Mark require extra care but can be grown successfully in North Georgia.
| Table 2. Apple Rootstocks Available for Georgia |
| Vigor |
Rootstocks |
| Standard (very vigorous) |
Seedling |
| Semi-standard (vigorous) |
M2, MM 111, MM 106 |
| Semi-dwarf |
M7, M4, M26 |
| Dwarf |
M9, Mark |
Clonal rootstocks are available from rootstock nurseries specializing in apples.
Peach and Nectarine Rootstocks
The primary rootstock for peach and nectarine trees in Georgia are Lovell peach seedlings, but others used on occasion are Nemaguard and Halford. These rootstocks are produced as described in the "Seed Germination" section of this publication. Peaches and nectarines can also be propagated by softwood cuttings and grown on their own roots.
Plum Rootstocks
Most plums are propagated on Lovell peach seedlings, with a few being propagated on Nemaguard peach seedlings. Plums can also be propagated by softwood cuttings and grown on their own roots.
Persimmon Rootstocks
The preferred rootstock for persimmon is the Oriental persimmon, Diospyros khaki. Trees propagated on D. khaki seedlings live longer and produce fewer root suckers than trees on the American persimmon, D. virginiana. Seedlings of D. lotus are also used as rootstocks for Oriental persimmons.
Pear Rootstocks
The most commonly used rootstock for pears in the Southeast is the Oriental pear, Pyrus calleryana. Several rootstock nurseries produce P. calleryana seedlings for sale to fruit tree nurseries.
Dwarf pear trees require the use of special quince rootstocks—either Angers quince or Provence quince—to produce dwarfing of the scion variety. Both of these clonal quince rootstocks are incompatible with most pear varieties. Therefore, a 3- to 4-inch interstem piece of pear wood compatible with both the clonal quince rootstock and the desired scion variety must be used to bridge the incompatibility. The pear variety 'Old Home' is the universally accepted interstem used for this purpose.
Care of Rootstocks
If seedlings are grown at the nursery and are to be budded, they should be left in place in the nursery row. Some thinning may be required if the seedlings are too close.
When the whip graft method of propagation is to be used, the rootstocks received from rootstock nurseries—or grown and dug by the grafter—must be stored properly to ensure they are in good condition when they are grafted. Rootstocks should be held at 34 to 38 °F and kept moist, not wet. Upon arrival from the rootstock nursery or after digging, the rootstocks should be placed in containers and roots completely covered with sawdust. These containers should be placed in a cold storage room and removed as needed for whip grafting.
Caution: Do not store rootstocks, fruit trees or scionwood in a room containing fruits and/or vegetables. Gasses given off by the produce will injure or kill the trees or propagation material.
Collecting Scionwood for Grafting
Whip, cleft, bark and saw-kerf grafting require dormant scionwood of the desired variety. Select shoots that grew during the last growing season. Moderately vigorous to vigorous shoots are best. Water spouts are satisfactory. Make sure the shoots are insect and disease free and are true to type. Tie the bundles of each variety and identify them with a permanent label. Remember, a wooden label marked with a regular ballpoint pen is trouble. If it gets wet, the ink will smear or wash off completely. Use a pencil or a horticultural pen for marking wooden tags. Regardless of what type tag you use, make sure the name will stay on it under adverse conditions.
To store the scionwood, place each variety in a moist (not saturated) medium, such as sphagnum moss, sawdust, paper towels or old cloth, and wrap it in plastic. A garbage can liner will do. Do not let the wood dry out. The wrapped packages of propagating wood should then be stored in a refrigerated room at a temperature range of 34 to 38 °F. Properly stored scionwood should remain in good condition until it is ready for use in late winter or spring.
Whip Grafting
Seedlings or clonal rootstocks are grafted in February or early March while still dormant. Following grafting, they are placed in moist, green pine sawdust, peat or sphagnum moss and stored where the temperature is approximately 45 to 50 °F. Be sure to check them for drying while in storage; they should be moist but not wet. They should be transplanted in early April in the nursery row or directly in the planting hole where the tree(s) is to be located.
To make the graft, use a sharp knife and make cuts approximately 1 inch long at the base of the scion and at the selected place on the rootstock. Clonal rootstock should be grafted 10 to 12 inches above the roots, while seedlings are grafted 1 to 2 inches above the roots. Make a 0.5-inch long reverse cut that is nearly parallel to the first cut on each of these surfaces (Figure 1).
 Figure 1.
 Reverse cut
The scion piece and the rootstock are then fitted together so the cut surfaces match on one side (Figure 2A). It is best to get a match on both sides (Figure 2B). The whip grafting operation is completed when the graft is tied with a rubber band or tape and painted with a tree wound dressing.
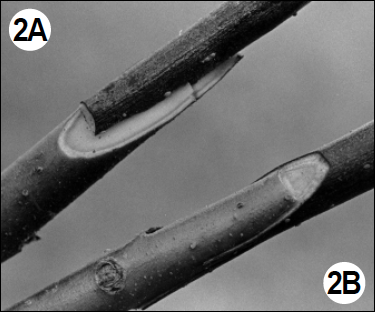 Figure 2 a (left) and b (right).
 Match surfaces
Figure 3A illustrates a finished whip graft on a clonal rootstock; 3B illustrates a finished whip graft on a seedling rootstock.
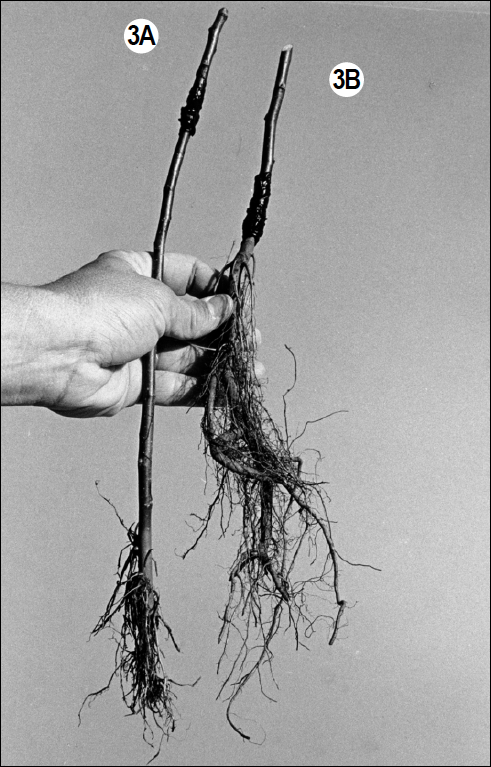 Figure 3 a (left) and b (right).
 Whip grafts
Caution: When grafts are set out in the nursery, always handle them by the rootstock. Do not bump the scion because this may disturb the callus tissue, causing the graft to die.
Clonal stocks should be set with the graft union 6 to 8 inches above the soil line in the nursery or 1 to 2 inches above the soil line in the permanent planting hole. Grafts on seedling rootstocks should be planted with the graft union 1 to 2 inches above the soil line in the nursery and 1 inch below the soil line in the permanent planting hole.
Collecting Budwood for T-budding
Budwood should be of the current season's shoots that are growing vigorously. Make sure the budwood is insect and disease free and is true to type. Clip off the leaves with a sharp knife, leaving about a quarter inch of the petiole. When cutting off the leaves, do not cut into the bud stick with the knife. At all times, the budwood should be kept moist—both before and after clipping off the leaves. Where a two- or three-day supply of buds is cut at one time, wrap the bud sticks in damp paper and store in a plastic bag in a cool place. Properly prepared bud sticks should remain in good condition for three days and possibly longer.
T-budding
This method of propagation is used in the summer (called June budding) or late summer (called dormant budding). Apple and pear trees 3 years old or less may be topworked by T-budding if a variety change is desired. June budding is done as soon as mature current season's buds can be cut (mid-June) and continues through July. Two to three weeks after budding, cut the rootstocks off about a half inch above the bud and remove all suckers from the stock. This will force the bud of the desired variety to grow.
Dormant budding is done in late August or early September, but the buds are not forced until the following spring. In March following dormant budding, cut the rootstocks off about a half inch above the bud.
To bud, select the proper point on the stock—8 to 10 inches for clonal rootstock, 2 to 3 inches for seedling rootstock in the nursery and 1 inch above the ground line for both types of roots in the tree's permanent location. Wipe the stock clean of soil and leaves that may interfere with budding.
Make a T-shaped cut—first the vertical cut (Figure 4), then crossing the "T." (Figure 5). Do not cut into the wood.
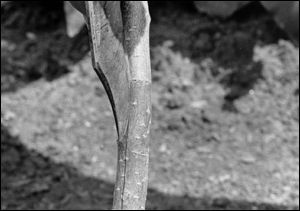 Figure 4.
 Make vertical cut
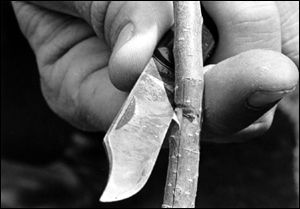 Figure 5.
 Cross the T
Next, select a good bud with the petiole stub intact (Figure 6). To cut the bud, begin the cut about 0.75 inches below the bud, cutting under the bud and up the bud stick (Figure 7).
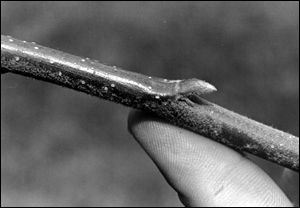 Figure 6.
 Petiole stub intact
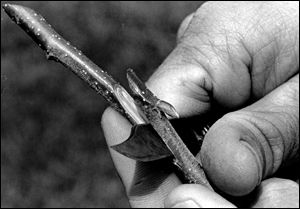 Figure 7.
 Cut up bud stick
Cut across the top of the bud about a half inch above the bud (Figure 8), then peel the bud off (Figure 9). Notice that the wood stayed with the bud; the bud peeled cleanly at the cambium.
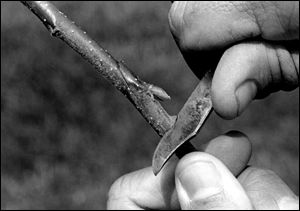 Figure 8.
 Cut across top of bud
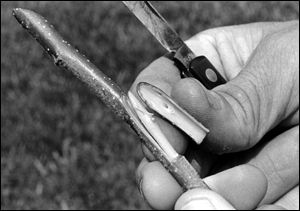 Figure 9.
 Peel bud off
Gently insert the bud into the T, using the petiole stub to help protect the bud (Figure 10).
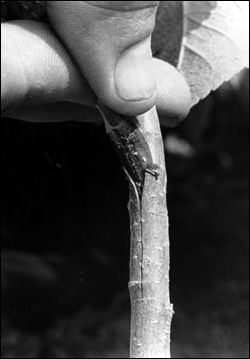 Figure 10.
 Insert bud into T
Figure 11 shows a bud properly seated before tying. Figure 12 shows a tied bud. In tying, do not mash the bud or the petiole stub with the rubber band. As previously mentioned, June buds should be forced in two to three weeks, while dormant buds are not forced until the following March.
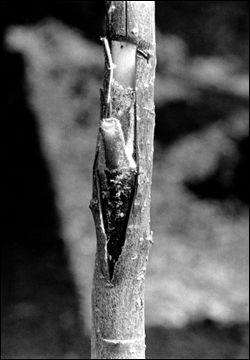 Figure 11.
 Properly seated bud
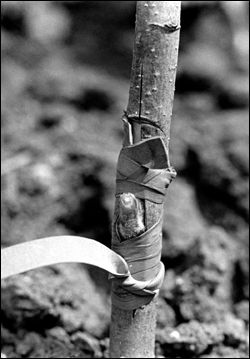 Figure 12.
 Tied bud
Grafting Techniques to Topwork Existing Trees
T-budding is often used to topwork apple and pear trees 3 years of age of less. Older apple, pear and persimmon trees are topworked using cleft or bark grafts. The saw-kerf graft is primarily used to topwork peach, nectarine and plum trees.
Cleft Grafting
When cleft grafting is done, it is best to leave a nurse limb to keep the tree alive until the grafted scions are growing well. The nurse limb can be removed in midsummer or topworked the following winter if the scions are growing well.
Scionwood should be gathered and stored as discussed previously. Late February and March—just before new growth begins —is the time to cleft graft. After growth begins, the bark graft is used.
To cleft graft, cut the desired limbs off and smooth around the edges (Figure 13). These limbs should be 1 inch or larger in diameter. Split the stock with a cleft grafting tool or hatchet, being sure not to split any knots (Figure 14).
 Figure 13.
 Smooth edges
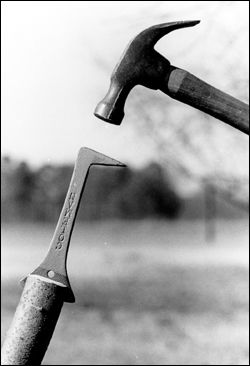 Figure 14.
 Split stock
Open the split by inserting the end of the cleft grafting tool or a screwdriver in the center of the split (Figure 15). Scions having three or four buds are cut on the lower end on each side, forming a wedge-shaped cut that is narrower on the opposite side (Figure 16).
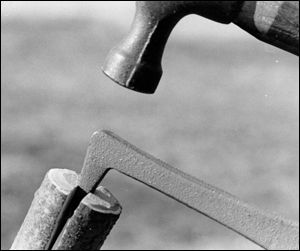 Figure 15.
 Open split
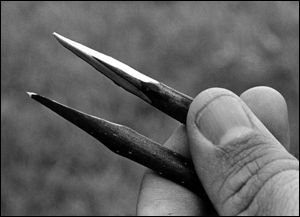 Figure 16.
 Wedge-shaped cut
Insert the scions into the cleft, with the narrow side of the scions toward the center of the stock (Figure 17). Gently remove the cleft grafting tool or screwdriver so the stock will close tightly on the scions. Extreme care must be taken to match the cambiums of the scions and stock.
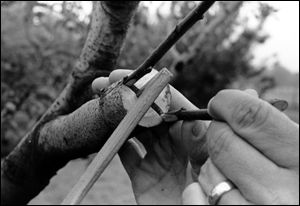 Figure 17.
 Insert scions
Tightly wrap the outside of the stock (Figure 18) then paint the graft area with a tree wound dressing compound (Figure 19).
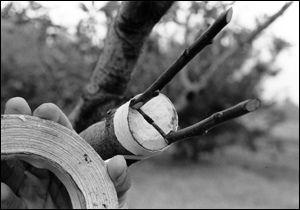 Figure 18.
 Wrap stock
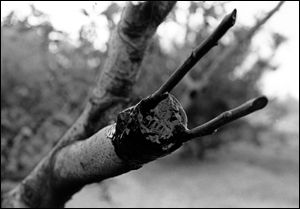 Figure 19.
 Dress graft
Six to eight weeks after the grafts begin to grow, cut on two sides of the stock away from the grafts in the area where the tape is. This will allow the tape to eventually peel off, preventing the possibility of girdling. Do not remove the tape. It should peel off naturally.
Caution: If the grafts grow vigorously, tack to the stock by each graft a 0.5-inch by 2-inch slat. Tie the vigorous shoots to this slat for support. Otherwise, wind may blow the unsupported grafts off.
Bark Grafting
This is another method used to change varieties of trees too large to T-bud. As with cleft grafted trees, the variety change should be done over a two-year period to reduce tree shock from the heavy cutting. Scionwood should be gathered and stored as discussed previously. Mid-April through mid-May is the best time to bark graft—after the bark will separate readily from the wood.
To bark graft, cut the desired limb off and smooth around the edges (Figure 20). Next, two scions should be cut, each having three or four buds. To cut each scion, one side should be cut about 1 to 1.25 inches long and the opposite side about 0.5- to 0.75-inch long (Figure 21).
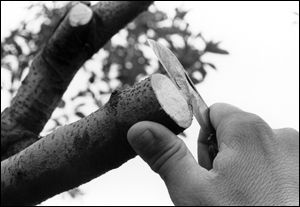 Figure 20.
 Smooth edges
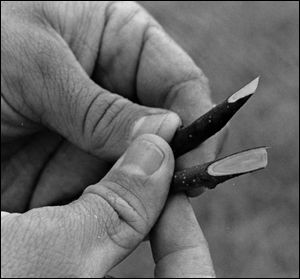 Figure 21.
 Cut two scions
Place a scion against the stock and outline each edge of the scion with a knife (Figure 22).
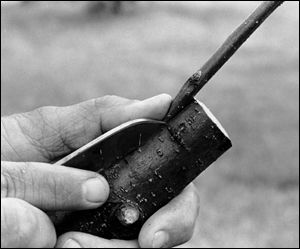 Figure 22.
 Outline scion edges
Pull the top of the bark strip away from the stock (Figure 23), insert the end of the scion (short cut side outward) and push downward until the scion is seated (Figure 24).
 Figure 23.
 Strip bark
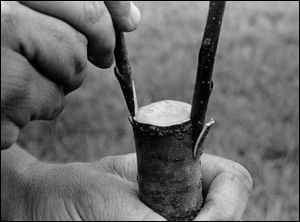 Figure 24.
 Seat scions
Once the scions are in place, tape firmly with grafting, adhesive or masking tape (Figure 25), and thoroughly cover the graft with tree wound dressing (Figure 26).
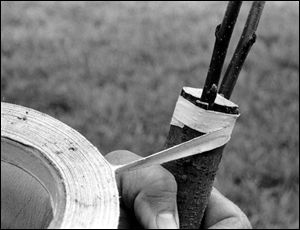 Figure 25.
 Tape graft
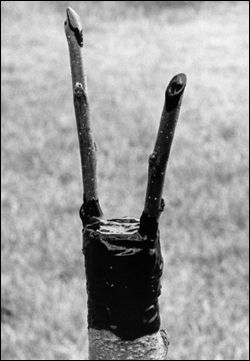 Figure 26.
 Dress graft
Ten to 12 weeks after the grafts begin to grow, cut on two sides of the stock away from the grafts in the area where the tape is. This will allow the tape to eventually peel off.
Caution: If the grafts grow vigorously, tack to the stock by each graft a half-inch by 2-inch slat. Tie the vigorous shoots to this slat for support. Otherwise, wind may blow the unsupported grafts off.
Saw-kerf or Notch Grafting
Saw-kerf has the same advantage as the cleft graft in that the work can be done over a long period of time—usually February and March.
Even though this grafting method requires more skill than the cleft graft, it has an advantage over the cleft in that knotty stock that cannot be split properly can still be grafted. In addition, there is less danger of wood-decay organisms.
Scions should be cut wedge shape, with the outer edge slightly thicker than the inner (Figure 27). After cutting the wedge on the bottom of the scion, cut the scion off, leaving two or three buds. The lower bud of the scion should be on the outside near the top of the wedge cut.
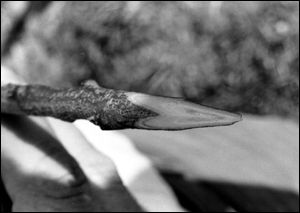 Figure 27.
 Cut stock
Cut the stock with a fine-tooth saw, using approximately a 45° angle with the flat surface of the stock (Figure 28). The saw cut should go into the stock so that it extends 4 to 5 inches from th
Status and Revision History
Published on Aug 01, 1999
Published on Feb 24, 2009
Published with Full Review on Feb 13, 2012
Published with Full Review on Feb 20, 2015
Published with Full Review on Mar 30, 2022